

Introduction
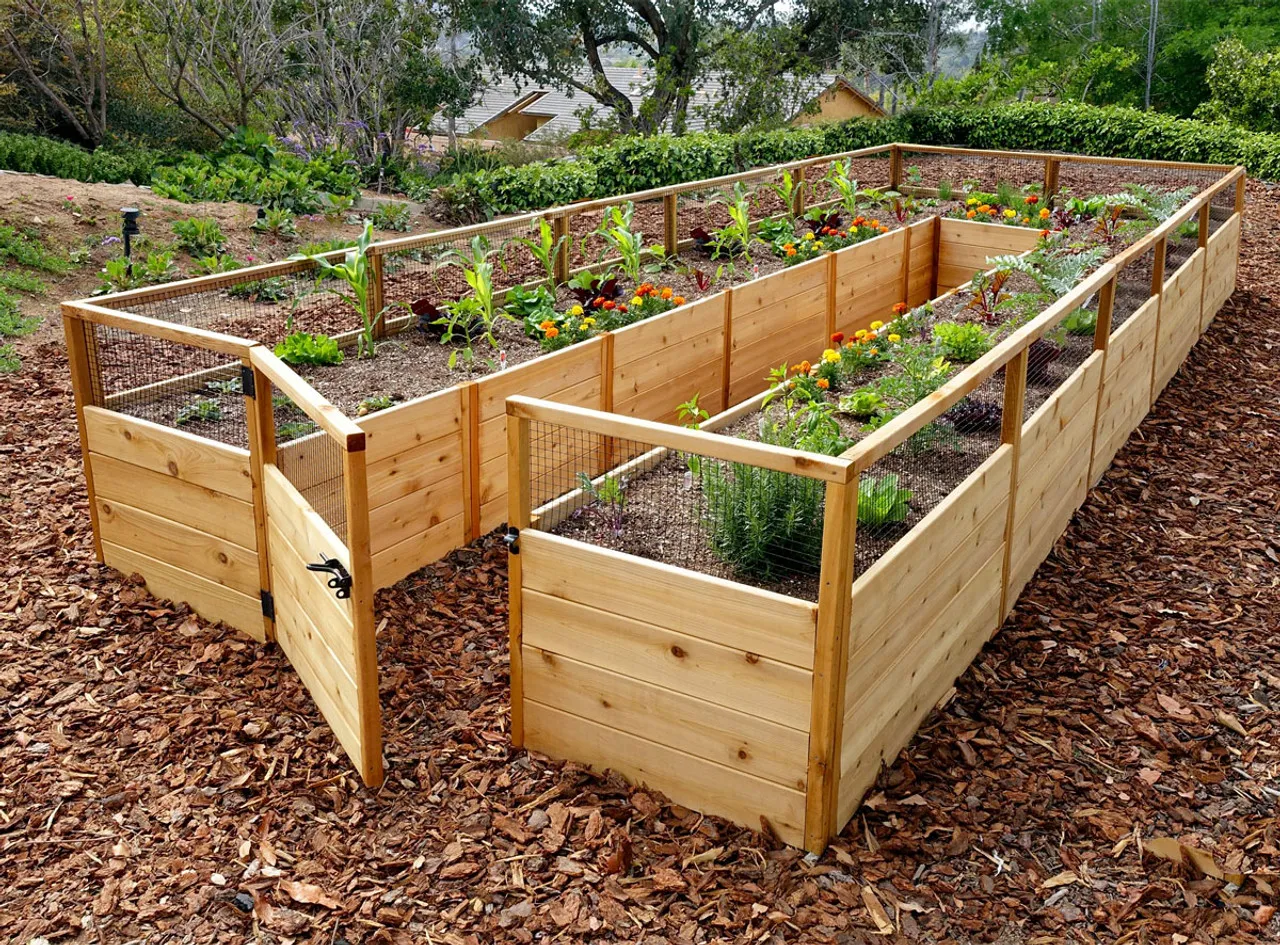
Raised garden beds are enclosed rectangular boxes that you fill with soil and use for growing vegetables, flowers, herbs, and other plants. The "raised" aspect lifts the soil above ground level, resulting in several benefits compared to growing plants directly in the existing soil.
Some key advantages of raised beds include:
- Improved drainage - The box structure and filling allows you to create the ideal well-draining soil mix.
- Easier access - Less bending down to tend plants since the bed is elevated. This makes gardening more comfortable.
- Extended growing season - The loose, nutrient-rich soil warms up faster in spring for an earlier start.
- Better growth - You have complete control over the soil quality and can provide loose, nutrient-rich, fertile soil ideal for plant growth.
- Weed control - The box and barriers prevent encroaching weeds and grass. Less weeding needed.
- Space efficiency - Can intensively plant in organized rows and use vertical trellises. Higher yields in a small space.
Building a raised bed involves constructing a frame to hold the soil, filling it with a quality growing medium, and planting your crops. The frame is typically built from wooden boards, plastic lumber, concrete blocks, bricks, or other durable materials.
This guide will walk through the complete process for constructing your own raised garden bed tailored to your space and growing needs.
Materials Needed
To build a raised garden bed, you will need:
- Wood - The most common types of wood used are cedar, redwood, and pine. Cedar and redwood are naturally rot-resistant woods and do not require additional treatment. Pine is cheaper but will need to be treated to prevent rotting. Wood can be purchased as full boards or timbers. The dimensions depend on the size of the bed you want to build.
- Screws and brackets - Stainless steel screws are recommended as they will not rust over time. You will also need corner brackets to join the boards together. Galvanized decking screws or exterior wood screws also work well.
- Landscape fabric (optional) - Placing landscape fabric on the bottom and sides before adding soil can help reduce weed growth inside the bed.
- Additional materials - Plastic or metal lining may be used on the inside of the bed to fully prevent any interaction between the soil and the wood framing. Pea gravel or rocks in the bottom can improve drainage.
The specific dimensions, amount of wood, and additional hardware will vary based on the size of the raised bed you are looking to construct. Planning the layout and dimensions ahead of time is important to purchase the required materials.
Design and Layout
When designing your raised garden beds, there are a few key factors to consider:
Shape and Size
- The most common shapes for raised beds are rectangles or squares, but you can get creative with circular or curved beds too. Just keep in mind that you'll need access to the entire bed for planting and maintenance.
- As for size, a typical raised bed is about 3-4 feet wide and anywhere from 8-12 feet long. This allows you to reach into the middle of the bed from either side without stepping on the soil. Make sure to size your beds so they work for your space.
- The standard recommended depth for a raised bed is between 6-12 inches deep. This provides enough room for most plant root systems to grow and thrive.
Sunlight Needs
- Pay attention to how the sunlight hits different parts of your yard throughout the day. Most vegetables and herbs need at least 6 hours of direct sunlight per day.
- Position your raised beds so the long side faces south or west to maximize sunlight exposure. Avoid shady areas.
Spacing Between Beds
- Leave 2-3 feet of space between your raised beds so you have room to move between them for planting and maintenance.
- Allow for wider paths (3 feet+) if you plan to use a wheelbarrow for harvesting.
- Space beds far enough from fences, structures and trees to allow sufficient sunlight to reach plants.
Preparing the Site
Before you start building your raised beds, you'll need to prepare the site. This involves making sure you have a flat surface for your beds to sit on, removing any grass or weeds, and considering drainage.
First, look at the area where you plan to install the raised beds. You want this to be as level as possible. If the ground is uneven, the raised beds could become misshapen or unstable over time. Use a shovel, rake, or hoe to flatten out any high or low spots. Aim for the soil to be about 4-6 inches below where you want the top of your raised bed frame to sit.
Next, remove any grass, weeds, or vegetation in the area. Dig these up by the roots or spray the area with an herbicide. Removing these now will help prevent weeds from invading your raised bed soil later. If your raised beds will be directly on top of lawn grass, lay down a weed barrier fabric before building the beds.
Finally, plan for drainage. Make sure your raised beds site does not get overly soggy after rain. Improve drainage by using gravel, sand, or drainage pipes under the beds if needed. You want excess moisture to drain away from the beds while still retaining plenty of water in the soil for your plants. Installing your beds on a slight slope can also help with drainage.
With the site cleared, flattened, and prepared for drainage, you'll have an ideal base for your DIY raised garden beds.
Building the Frame
After you have your wood cut to the desired lengths and your corner joints prepared, it's time to assemble the raised bed frame. Here are some tips for putting it all together:
- Cut wood with a miter saw, circular saw, or handsaw to ensure straight edges. Measure precisely and cut wood to your planned dimensions.
- Assemble the corners first by fitting a long side piece into a short end piece at a 90 degree angle. Use galvanized deck screws, exterior wood screws, or nails to secure. Predrill holes to prevent splitting.
- Reinforce the sides by driving screws every 12-16 inches into each corner and juncture where boards meet. Stagger the location of screws for maximum strength.
- Make sure boards fit snugly with no major gaps. Use a rubber mallet to gently tap pieces into place. Apply wood glue between pieces for added stability.
- Use scrap wood pieces, metal brackets, or wooden stakes on the outside of corners for additional structural support if needed.
- Square up the frame and ensure it forms a true rectangle before screwing it completely together. Measure diagonally across corners to check.
- Consider adding an extra center support beam down the middle for large raised beds over 4 feet in length.
- Check that the frame is level across the tops of all sides. Shim boards if necessary before filling with soil.
The completed frame should form a sturdy base ready for the garden soil and plants. Take care in this construction step to build a raised bed that will hold up over time.
Adding Soil
The soil mix you use in your raised beds is crucial for growing healthy plants. The ideal mix contains a blend of organic materials that provide nutrients for plants.
Recommended Soil Mix
A good general soil mix for raised garden beds is:
- 1/3 compost - Provides nutrients and improves soil structure. Use high-quality compost made from yard waste, not contaminated compost.
- 1/3 peat moss or coconut coir - Helps retain moisture and adds organic matter. Peat moss is more absorbent but coco coir is more sustainable.
- 1/3 vermiculite or perlite - Improves drainage and aeration. Vermiculite holds more water while perlite provides better aeration.
You can adjust this recipe based on your specific needs. For example, add more compost for nutrient-hungry vegetables or more perlite/vermiculite if drainage is an issue. Avoid heavy clay garden soils in raised beds.
Depth of Soil
For most vegetable gardens, aim for a soil depth of at least 12 inches. This provides enough root space for crops. Up to 18 inches is ideal for root vegetables like carrots and potatoes.
Shallow soil under 6 inches deep will limit plant growth. Deep soil retains moisture better while shallow beds may need more frequent watering.
Filling the Beds
It's easiest to mix soil directly in the garden beds. Spread a layer of each material as you build up to the desired soil depth. Mix and blend periodically with a shovel or garden fork.
If mixing ahead, make sure the bed has drainage holes before adding soil. Fill beds gradually, tamping down with a tamper or flat shovel to prevent settling. Leave about 1-2 inches unfilled at the top to allow for mulching.
Level and smooth the soil, removing any large clumps or rocks. Before planting, water thoroughly to help compact and settle the soil.
Planting
When planting your raised garden bed, you’ll want to consider the suitable plants, proper spacing, and arrangement.
Suitable Plants
The key to a successful raised garden is choosing the right plants. Consider the amount of sunlight your bed gets, and pick vegetables and flowers that thrive in those conditions. For example, for full sun look for tomatoes, peppers, herbs, lettuce, spinach, beans, carrots, and more. If your bed gets shade, try leafy greens, broccoli, cabbage, kale, and root vegetables. You can plant flowers like marigolds and zinnias in sun or shade.
Spacing
Proper spacing ensures your plants have enough room to grow. Refer to the seed packet or plant tag for recommended spacing. As a general rule, plant seeds or seedlings:
- 2-4 inches apart for small plants like carrots and radishes
- 4-6 inches apart for leafy greens and herbs
- 8-12 inches apart for larger plants like tomatoes and peppers
Don’t overcrowd your raised bed. Thin seedlings if needed.
Arrangement
When arranging your plants, group them by height and sun requirements. Put tall plants like tomatoes along the north side of your raised bed so they don’t block sun from shorter plants. Place shade lovers along the edges or under taller crops. Plant in blocks rather than rows to maximize space. Interplant quick-growing crops with slower growing ones. Scatter flower seeds to add color.
Watering and Fertilizing
Raised garden beds require regular watering to help plants thrive. How often you need to water depends on factors like soil type, weather, types of plants, and bed construction. Make sure to check the moisture level of the soil before watering. The top 2-3 inches of soil should be dry before adding more water.
It's important not to overwater raised beds. Too much moisture prevents roots from getting oxygen and can cause fungal diseases. Aim to water deeply and thoroughly, rather than frequent light waterings. Drip irrigation and soaker hoses work well to target the soil and avoid wetting foliage.
Amendments like compost help the soil retain moisture. Mulching with materials like wood chips or straw also reduces evaporation. Grouping plants with similar water needs together makes watering more efficient.
Fertilizing provides nutrients to help plants grow. Organic fertilizers like compost, compost tea, worm castings, and fish emulsion are good options for raised beds. Only apply as much fertilizer as plants can use to avoid waste and water pollution. Pay attention to timing based on the type of fertilizer and needs of specific plants.
Maintenance
Maintaining your raised garden beds will ensure your plants thrive in the healthiest environment. Here are some key maintenance tasks:
Weeding
Weeds will compete with your vegetables and flowers for water, nutrients and sunlight. It's important to stay on top of weeding your raised beds. Walk through your garden at least once a week and pull weeds as you see them. It's easiest to pull weeds when the soil is damp after watering. Try to remove the entire root system so the weed doesn't regrow quickly.
Pest Control
Common garden pests like aphids, slugs, snails and beetles can damage your plants. Inspect plants frequently for any pest infestations. Remove pests by hand or use organic pest control methods like insecticidal soaps, neem oil or diatomaceous earth. introduce beneficial insects like ladybugs and lacewings to naturally control pests.
Seasonal Upkeep
Raised beds require some seasonal maintenance. In fall, remove spent annual plants and till in some compost. Add mulch over the soil to protect it from cold weather. In winter, cover beds with plastic sheeting or fabric row covers to allow access for spring planting. In spring, turn and amend soil and repair any damaged areas of the raised bed. In summer, monitor soil moisture and nutrients closely in the warmer weather.
Tips and Considerations
Building your own raised garden bed can provide many benefits beyond just having a designated space to garden. Here are some things to keep in mind:
Cost Savings
Constructing a raised bed yourself is much less expensive than buying a pre-made kit at a garden store. Not only will you save money on materials by sourcing them yourself, but you'll avoid the high cost of labor that comes with a store-bought bed.
Accessibility
Raised beds are perfect for gardeners who have trouble bending over or working at ground level. Build your bed at least 6 inches high, or taller depending on your needs. This makes planting, weeding, and harvesting much easier on your back without having to kneel or crouch down.
Aesthetic Options
One of the best parts of a DIY raised bed is that you can customize the look completely. Stain or paint the wood, use different materials like bricks or stones for the sides, line it with landscape fabric - get creative! Match your garden bed to your home for a cohesive look.
For more DIY tips and tricks, DIYwithHelp have got you covered…
If you need some professional guidance for your project, be sure to sign up for a free account with DIYwithHelp.com. Once you have an account, you can search our site (or fill out a project request form) and connect with expert tradespeople who are willing to lend their advice over scheduled video-calls.

